MCP, Agentic AI Commerce, and Verified Identity: The Complete Guide
Chat-based AI is reshaping how people discover products, get support, and complete transactions. But the moment money or sensitive actions are involved, one question dominates: who is actually in the chat? This guide goes deep on the Model Context Protocol (MCP), what agentic AI and agentic commerce really mean, and how verified identity, backed by cryptographic tokens and JWKS, turns AI chat from a risky unknown into a trusted channel for commerce and compliance.
Part 1: What is MCP (Model Context Protocol)?
The problem MCP solves
Large language models (LLMs) are powerful, but they don’t natively have access to your data, your APIs, or your tools. To be useful in real products, they need a standard way to connect to external systems: databases, search, calendars, payment systems, and critically, identity and verification services. Before MCP, every AI app tended to invent its own way for the model to call out to the world. That meant one-off integrations, brittle glue code, and no shared ecosystem.
The Model Context Protocol (MCP) is an open protocol that defines how AI applications (clients) talk to external services (servers). It gives you a consistent way to expose “tools” and “resources” to an LLM so the model can decide when to call a tool, with what arguments, and how to use the result in the next turn of the conversation. Think of it as a standard API layer between the brain (the model) and the rest of the world (your backend, third-party APIs, identity providers, and so on).
Core concepts
- MCP server: A service that exposes tools (callable functions) and optionally resources (data the model can read). The server runs somewhere (on your infra or a vendor’s - Proofenance runs our own MCP server) and speaks MCP over a defined transport (e.g. HTTP with SSE, or stdio for local tools).
- MCP client: The application that hosts the LLM and the conversation. It connects to one or more MCP servers, discovers their tools and resources, and when the model decides to use a tool, the client sends the appropriate request to the server and feeds the response back into the model’s context.
- Tools: Named operations the server exposes. Each tool has a name, description, and an input schema (e.g. JSON Schema). The model chooses which tool to call and with what arguments; the server executes the operation and returns a result. Examples: “search_documents”, “create_calendar_event”, “verify_identity”, “get_identity_status”.
- Transport: How the client and server communicate. Common options include HTTP with Server-Sent Events (SSE) for request/response and streaming, or stdio for local processes. In production, HTTPS to a hosted MCP server (e.g.
https://mcp.proofenance.com) is typical.
The diagram below shows a basic structure of an MCP server in the loop: the Visitor interacts with Chat and with a Service (e.g. Shopify); the Model Context Protocol Server connects to the Service API and to an AI Provider (e.g. OpenAI), so the service can use the provider for AI tasks while the MCP server manages context and orchestration between chat, API, and AI.
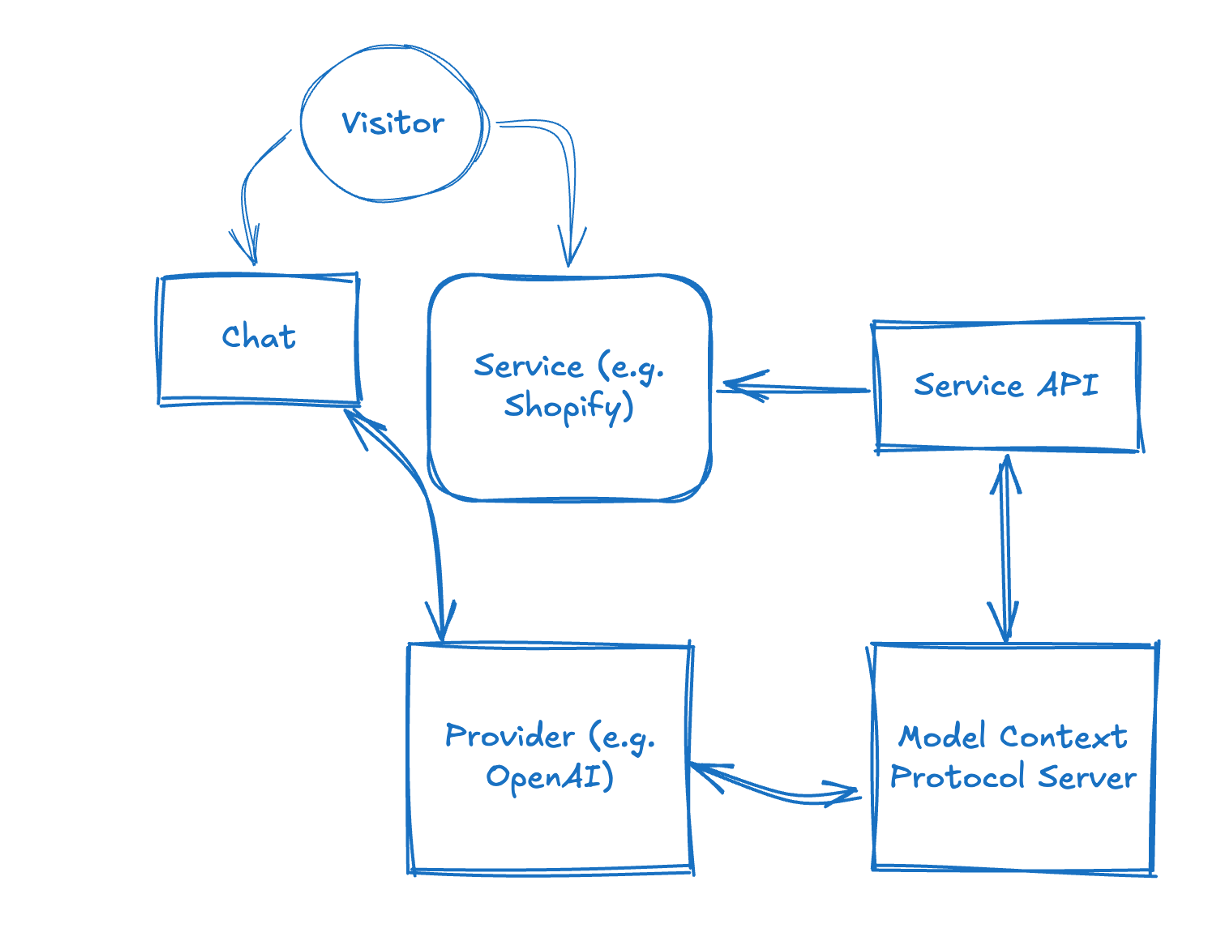
Basic structure of an MCP server connecting to API and chat. The Visitor uses Chat and Service; the MCP Server talks to the Service API and the AI Provider to orchestrate context and actions.
Why MCP matters for identity and commerce
Once your AI chat is an MCP client, it can call any MCP server that offers relevant tools. That’s where identity comes in. An identity provider (like Proofenance) can run an MCP server that exposes tools such as:
- verify_identity: Start a verification flow; returns a link for the user to complete email/phone/document checks.
- get_identity_status: An MCP tool name (an AI tool your client calls, not a REST or GraphQL endpoint). Check the status of that verification; when complete, the tool response includes the verified identity and a signed identity JWT.
So the same conversation where the user says “I want to buy this” can trigger a tool call to verify them; the user may be directed outside the chat (e.g. to complete the flow in a browser); after completing the flow they are redirected back to the chat, or they can complete verification asynchronously. The next tool call returns the identity token. No need to send the user to a separate app; the experience remains tied to the chat, and the proof of who they are lives in a cryptographically signed token your backend can validate. That’s the essence of identity in AI chat via MCP.
Part 2: What is Agentic AI?
Normal AI: bounded by a sandbox
Current "normal" AI chat is often bounded by a sandbox: the model has a fixed knowledge cut-off date and no built-in way to reach the outside world. The visitor talks to the chat, the chat talks to the provider (e.g. OpenAI), but everything stays inside a boundary that blocks external data and live actions. The AI can only answer from what it was trained on.
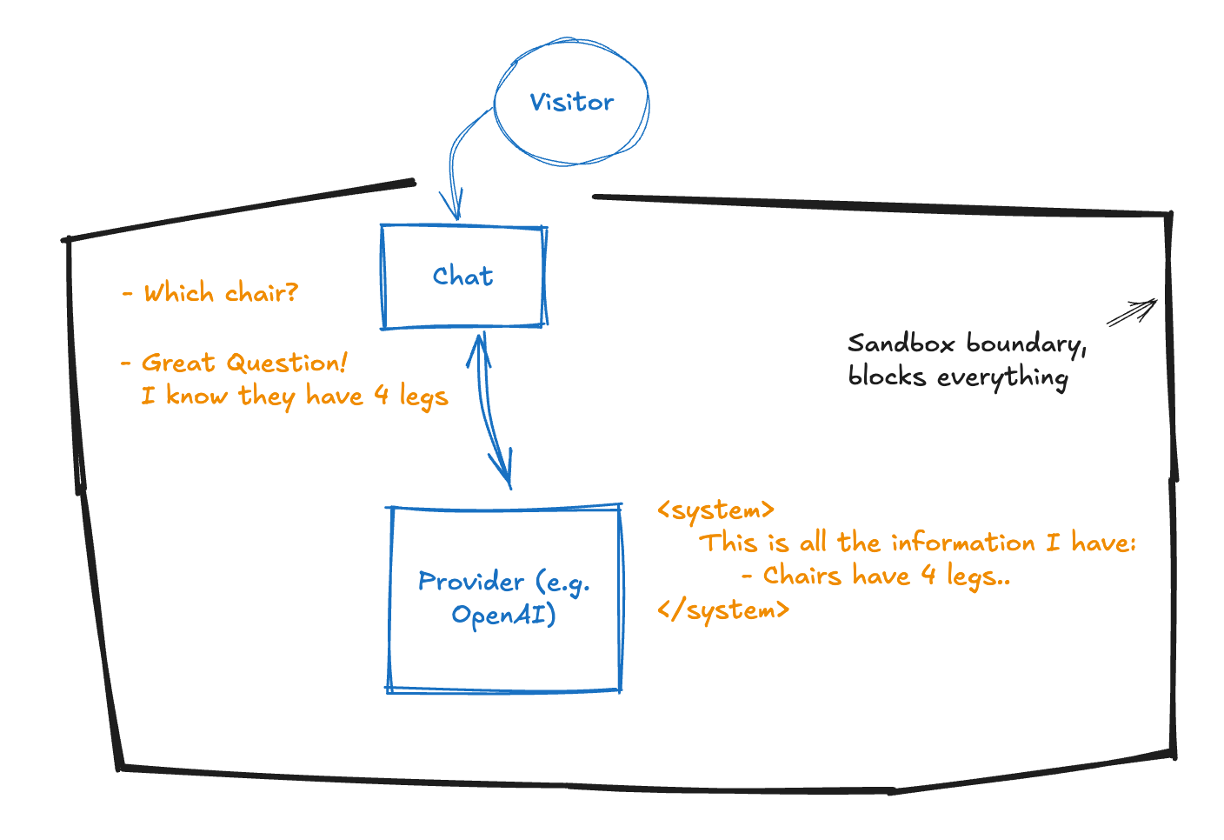
Normal AI: the system is bounded by a sandbox and has a knowledge cut-off; it cannot access the outside world or real-time data.
Agents break through the sandbox
Agents change the picture: the model can call tools that reach beyond the sandbox. An AI agent can talk to the outside world, third-party APIs, your backend, identity providers, so the conversation is no longer limited to pre-trained knowledge. The sandbox still blocks most things by default, but allowed integrations (e.g. via MCP) let the AI fetch live information and take actions on the user's behalf.
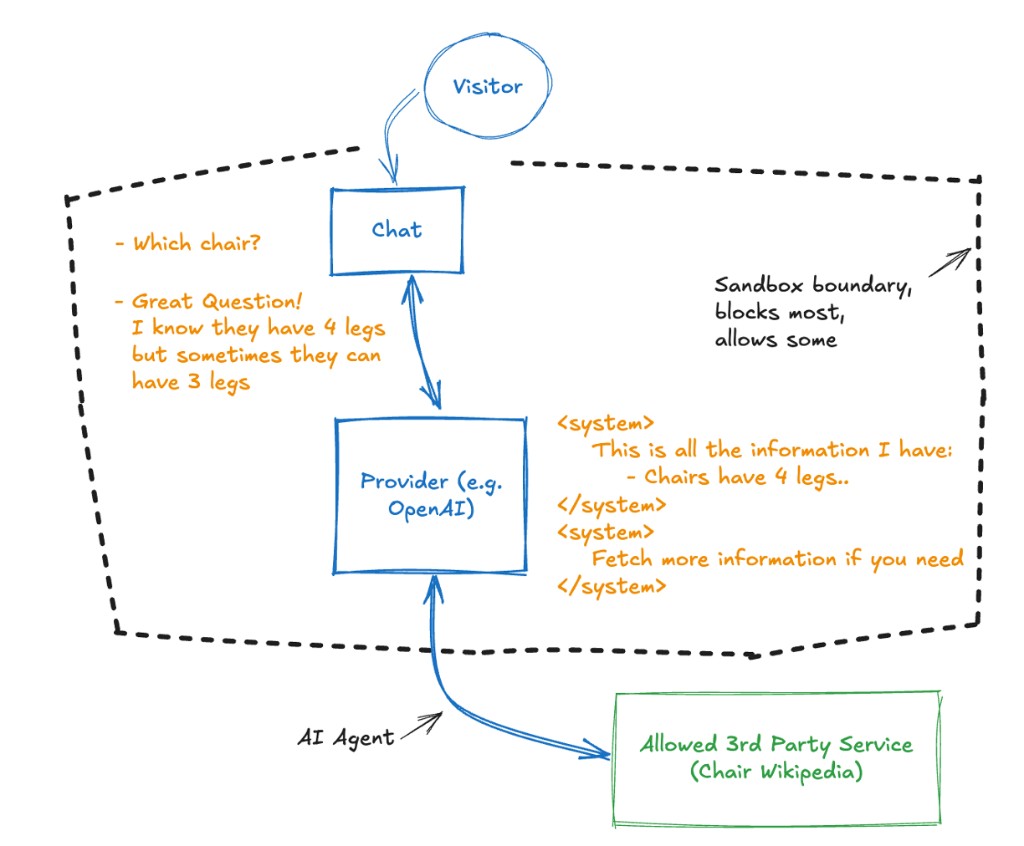
With agents, the AI can go through the sandbox wall to allowed third-party services and the outside world, enabling tool use and live data.
From assistants to agents
Traditional “chatbots” or “assistants” often follow fixed scripts or simple decision trees. Agentic AI refers to systems where the model doesn’t just answer from memory or a single API; it plans, uses tools, and takes actions in the world. The model might search the web, query a database, call an API, send an email, or (in our case) start an identity verification flow. It decides when to use which tool and how to combine results into the next message. That autonomy and tool use is what makes it “agentic.”
Characteristics of agentic systems
- Tool use: The model has access to tools (e.g. via MCP) and chooses when to call them based on the conversation and the tool descriptions.
- Multi-step reasoning: The agent can chain several tool calls and user messages before giving a final answer or completing a task.
- State and context: The conversation has context (history, session, user state). For commerce and identity, that context should eventually include “this user is verified” and “this user has identity token X.”
- Orchestration: Something (often the same LLM or a thin orchestration layer) coordinates tool calls, handles errors, and keeps the conversation coherent.
In practice, “agentic AI” is the pattern behind AI coding assistants that run commands, AI customer-service bots that look up orders and issue refunds, and AI shopping experiences that recommend products, check availability, and with the right tools, verify the buyer and complete the sale.
Part 3: What is Agentic AI Commerce (Agentic Ecommerce)?
Commerce in the chat
Agentic AI commerce (or agentic ecommerce) is the idea that buying and selling can happen inside an AI-driven conversation. The user doesn’t leave the chat to go to a checkout page; instead, they might:
- Ask the agent what’s available, get recommendations, and clarify options.
- Say they want to purchase something; the agent confirms price, delivery, and terms.
- Provide payment and identity in the same flow, e.g. the agent triggers identity verification via MCP, the user completes it, and the agent then initiates or confirms payment tied to that verified identity.
So “agentic commerce” is transactional commerce where the primary interface is an AI agent, and the agent has the tools to complete the full journey: discovery, decision, identity verification, and payment.
Why it’s different from “chat on a website”
On a normal ecommerce site, chat is often a support widget: answer questions, maybe push a link to a product page. The actual purchase happens on the site’s checkout. In agentic commerce, the agent is the storefront. It has to be able to:
- Represent inventory, pricing, and availability (via tools/resources).
- Confirm the buyer’s identity in a way that’s auditable and compliant (via identity tools).
- Trigger or complete payment in a way that’s tied to that identity (payment tools or integration with your payment stack).
That’s why verified identity in the chat isn’t optional; it’s the bridge between “someone said they want to pay” and “we know who they are and we can safely charge them.”
The identity gap in agentic commerce
Without verified identity:
- You’re trusting a handle, a session ID, or whatever the chat platform gives you. That’s not enough for KYC, AML, or high-value transactions.
- You can force a redirect to a separate “verify your identity” page, but that breaks the flow and hurts conversion.
- You can hope your payment provider will catch fraud, but then you don’t have a single story: “this chat session = this verified person = this payment.” You have fragments.
With verified identity in the chat (via MCP and a signed identity token):
- The same conversation that leads to “I’ll take it” is the one where the user proves who they are.
- Your backend receives a signed JWT you can validate with our JWKS; you know the claims (name, email, address, verification timestamps) are from Proofenance and haven’t been tampered with.
- You can tie payment to that identity session so you have one coherent record: who bought, what they bought, that they paid, all linked to the same verified person.
That’s the role of Proofenance Agentic Identity in agentic commerce: close the identity gap so the agent can sell with the same level of trust and compliance you’d expect from a traditional checkout.
Part 4: Verified Identity in Practice: Tokens, JWKS, and Integration
Two kinds of tokens in the flow
In our setup there are two important tokens:
- MCP access / connection auth: Your AI app (the MCP client) connects to our MCP server using either HTTP Basic (key + secret) or a Bearer JWT. That authenticates the client (your company’s integration), not the end user. You get these credentials when you create an MCP access key in the Proofenance dashboard.
- Identity JWT: Once the user completes verification (email, phone, document as required), we issue an identity JWT that represents that person. This token is signed by Proofenance with our private key (RS256). Your backend validates it using our public key, which we publish in a JWKS (JSON Web Key Set) at
https://proofenance.com/.well-known/jwks.json. You never need a shared secret with us for identity; only our public key.
What’s inside the identity JWT
When verification is complete, the identity JWT can contain (among other things):
- sub: The person’s stable ID in our system (person ID).
- aud: The audience; set to your account's company name.
- given_name, family_name, name: Verified name from document/identity check.
- birthdate: If collected and verified.
- address: Verified address (street_address, locality, postal_code, country).
- identity_verified_at: Unix timestamp when identity was verified.
- email: The verified email address.
- email_verified_at: When the email was last verified.
- phone_number: The verified phone number.
- phone_number_verified_at: When the phone number was last verified.
- Custom claims: Key-value pairs added to the token as defined in your API call when requesting the identity status (e.g. internal user ID, role).
Open identity standards and claims
Our identity JWT is built on open, standards-based formats so you can validate and consume it with standard libraries and integrate it with existing identity and compliance workflows. The token structure and many of the claims align with widely adopted specs.
-
JWT (JSON Web Token)
The token format itself is defined by RFC 7519. Standard JWT header and payload claims we use include:iss(issuer),aud(audience),sub(subject), andexp(expiration when applicable). See the JWT spec for registered claim names. -
JWKS (JSON Web Key Set)
Public keys used to verify the token signature are exposed as a JWKS athttps://proofenance.com/.well-known/jwks.json, as defined by RFC 7517. Your backend fetches the key set, selects the key bykidfrom the JWT header, and verifies the signature (e.g. RS256) using that public key. -
OpenID Connect (OIDC) and standard claims
Many of the identity claims we put in the token correspond to OpenID Connect Core 1.0 standard claims. The Standard Claims section of the OIDC spec definessub,name,given_name,family_name,email,email_verified,address, andbirthdate. We use these where applicable and add verification-specific claims such asidentity_verified_at,phone_number, andphone_number_verified_at, so the token is both standards-aligned and suitable for verified-identity use cases (e.g. KYC, agentic commerce).
When you validate the token, you are following the same JWT and JWKS semantics as in the specs above; the only Proofenance-specific behaviour is the exact iss/aud values and the extra claims we add for verification timing and custom data.
Where the identity JWT is available: in the chat and in the backend
The identity JWT is available in two places so you can both use it in the AI chat and in your backend:
- In the AI chat: The identity JWT is returned in the response from the get_identity_status MCP tool (an AI tool name your client invokes, not a REST or GraphQL endpoint), so it is available in the conversation context. Your agent can use the decoded claims (name, email, phone_number,
sub, etc.) for the conversation and for any in-chat logic without calling your backend first. - In your backend (Proofenance API): Your backend can make requests to the Proofenance API using the personId (the
subin the identity JWT). You get this personId when you start the identity check and again in the token once verification is complete. Use it to fetch or validate identity server-side. So you can retrieve and validate identity both in the chat (via the JWT in context) and in the backend (via API calls with the personId).
Always verify any identity JWT you receive using our JWKS before trusting its claims.
The diagram below summarises the flow: the chat (or MCP client) calls the verify_identity and get_identity_status tools; the user completes the verification steps and an identity JWT is issued; your service API or backend then validates that JWT using our JWKS (fetch keys, verify signature, check claims).
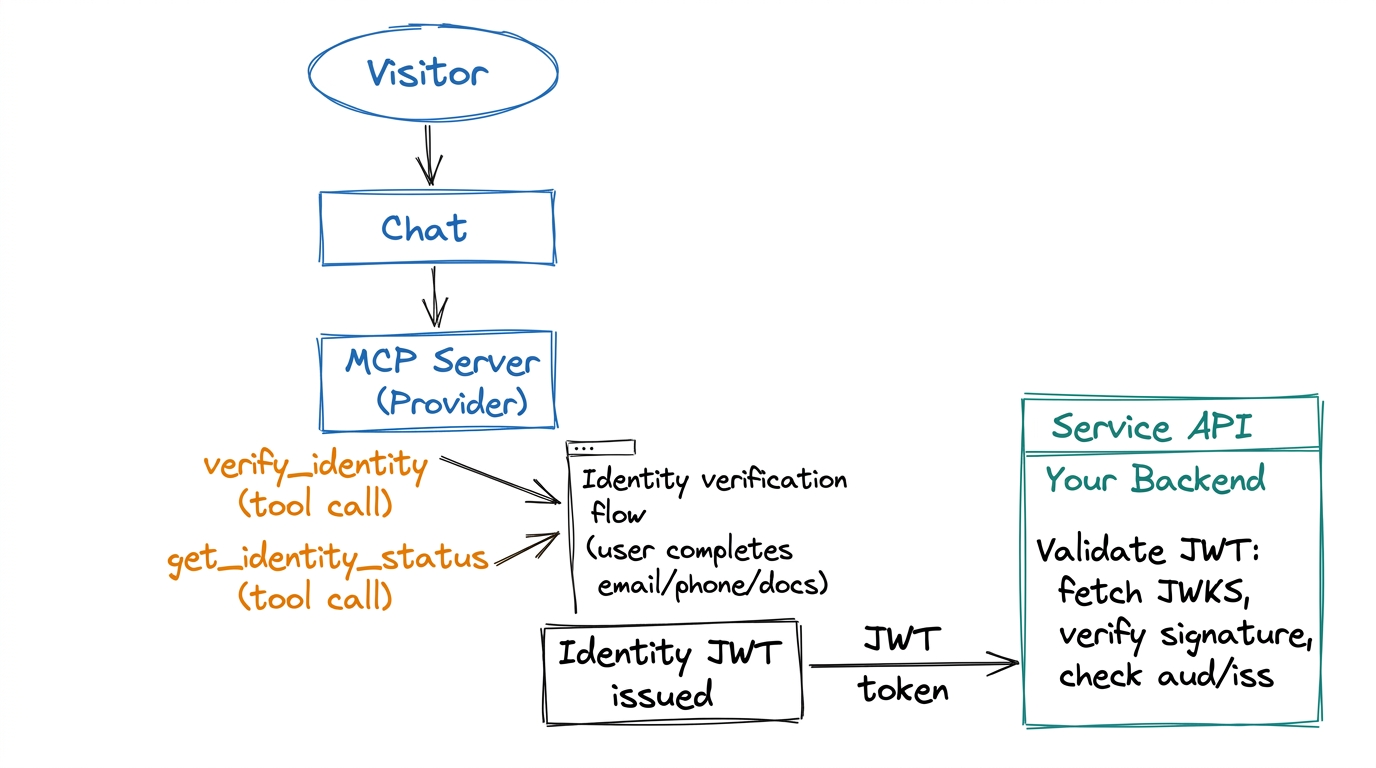
Basic flow: identity tool calls (verify_identity, get_identity_status), user completes verification, identity JWT is issued; your service API validates the JWT using our JWKS.
Validating the token with JWKS
To validate the identity JWT:
- Fetch the JWKS from
https://proofenance.com/.well-known/jwks.json. You can cache this and refresh periodically. - Find the right key using the token’s
kid(key ID) in the JWT header. Our identity key uses a stable key ID (e.g.proofenance-identity-1). - Verify the signature with the public key and algorithm RS256. Use any JWT library that supports JWKS (e.g. in Node:
jose, in Python:PyJWTwithcryptography, etc.). - Check claims: Ensure
iss(issuer) ishttps://proofenance.comandaud(audience) is your account's company name. Optionally checkexpif we add expiry, and any custom logic (e.g. minimum verification level).
Once verification passes, the token is authentic and the claims can be trusted for that request.
Verification flow in detail: email, phone, documents
How users complete each step:
- Email: The user receives a link at the email they give in chat. They may be directed outside the chat to open it; after completing the step they are redirected back to the chat, or they can complete verification asynchronously and return to the conversation later.
- Phone: We send an SMS. The user can either tap a link in the message or enter the code sent the same way directly into the chat (handy with "insert from SMS" on devices).
- Documents: For full identity checks, the visitor must upload documents in the browser. That ensures accuracy and avoids AI mishandling of sensitive data; once done, they are returned to the chat.
The user may be directed outside the chat for some steps (e.g. opening an email link or uploading documents in a browser). They are redirected back to the chat after completing the flow, or can complete verification asynchronously and return to the conversation later. All of these methods can be completed asynchronously; the same user, sub, and personId are persisted. If your backend later requests identity using the identity JWT (or personId) after the user has provided more information, we return an updated token with the extra data.
End-to-end flow (summary)
- User chats with your AI; at some point the agent needs to verify them (e.g. before purchase).
- Your MCP client calls our server’s verify_identity tool (or equivalent). The server returns a link (with access code) for the user to complete verification. The user may be directed outside the chat for some steps (e.g. email link, document upload in browser); they are redirected back to the chat after completing the flow, or can complete verification asynchronously (e.g. phone via link or code in chat).
- User completes the steps; our backend marks them verified and can issue the identity JWT. Same personId is used throughout; later requests can return an updated token if the user has added more info.
- Your app calls the MCP tool get_identity_status (an AI tool name, not a REST or GraphQL endpoint; using the same MCP auth as your account). When status is “complete,” the response includes the identity JWT and the verified identity payload.
- The identity JWT is now available in the chat (in the response from the get_identity_status MCP tool, so the agent context has the data) and in your backend: your backend can use the personId (
sub) from the token, or from the response when you started the identity check, to call the Proofenance API to retrieve or validate identity. Validate any JWT with our JWKS before trusting its claims.
Part 5: Why This Matters for Compliance and Trust
Bot-proof by design
Verification requires real-world actions: clicking a link in a real email, receiving a code on a real phone, or uploading a real ID. Bots and throwaway accounts can’t pass without controlling those channels. So every high-value action in chat (purchase, account upgrade, sensitive operation) can be gated on “this identity token is present and valid,” which in turn means a real person completed our flow.
One story for auditors and regulators
When identity and payment are tied to the same session and the same token, you have a clear narrative: “We verified this person via Proofenance; here is the signed token and the JWKS we used to validate it; this payment is linked to that person ID.” That’s exactly what compliance and auditors want: no gaps between “who said they were X” and “who actually paid.”
Friction and conversion
Identity in the chat doesn’t mean a clunky redirect to a different product. The user may be directed outside the chat for some steps (e.g. to open a link or upload documents); they complete the flow and are redirected back to the chat, or can complete verification asynchronously. The agent can then continue with “You’re verified; here’s the next step for payment.” So you get both trust and a smooth experience.
Part 6: Summary and Next Steps
- MCP is the protocol that lets your AI app call external tools (like identity verification) in a standard way. Our MCP server exposes tools to start verification and get identity status and the identity JWT.
- Agentic AI is the pattern where the model uses tools and takes actions; agentic commerce is doing discovery, identity, and payment inside the same chat.
- Verified identity in the chat closes the gap between “user said they want to pay” and “we know who they are.” The identity JWT, validated with our JWKS, gives you a cryptographically strong, auditable claim about the user.
- Proofenance Agentic Identity is our name for this stack: MCP server, verification flows (email/phone/document), signed identity token, and JWKS for validation; so you can build agentic commerce that’s bot-proof and compliant.
To go deeper on setup, credentials, and API details, see our Identity in AI Chat (MCP) feature page and our Agentic AI & Ecommerce solution. To validate tokens in your stack, hit https://proofenance.com/.well-known/jwks.json and verify with RS256; then you’re ready to tie every high-value action in chat to a real, verified person.
Written By

Tobin Chew
I have been both building payment networks, and implementing them for clients, since 2019. I love seeing technology come together to form a functional product which solves a real problem.